Some of the links below are affiliate links, meaning, at no additional cost to you, we will earn a commission if you click through and make a purchase.
GolfBuddy has released the brand-new LR7 golf rangefinder series, and these laser rangefinders will likely remain at the top of the competition again. Especially since rangefinders have always been regarded as the most accurate distance-measuring tool used in golf. Despite the development of tinier versions of it (i.e. golf GPS watches), their accuracy tends to fall short.
Just like their other rangefinder, the GolfBuddy LR5, this latest iteration is offered in two different models, namely: LR7 and LR7S. The former is the base model rangefinder, whereas the latter is the more advanced version, which will also be the main subject of this product review. Both are excellent models, but with the specification details below, you will realize why the LR7S can seem more superior, in terms of features at least.
GolfBuddy LR7S Golf Rangefinder

Click Here for Reviews
<<== BUY the GolfBuddy LR7S Golf Rangefinder Now ==>>
 Specifications
This golf laser instrument is around 4 inches in height, 1.63 inches in width, and 2.85 in depth. It weighs approximately 7.7 oz., excluding the battery, and is also water resistant. The display is of LCD quality, while the lens is multi-coated.
Images are magnified 6x closer, while the max range of the item is 5-880 yards, or 5-800 in meters, and with an accuracy of +/- 1 yard. Objective lens and eye relief rates at 23mm and 13mm, respectively. As for the battery, a CR2 3V lithium type is needed, which can produce from 2,000 to 4,000 actuations (laser fire).
Features and Technologies
 As far as the basic features and general construction are concerned, the LR7S by GolfBuddy does not differ much from its base product. There are, however, some minor color changes to this one, as well as the addition of the letter “S” on its product name.
Just like the standard model, you can still find the power and mode buttons at the top of this gadget. The 6x monocular eyepiece and diopter adjustment are at the upper back, and below it is the battery compartment. At the front, you can find the objective lens and laser aperture.
When it comes to the construction, the Golf Buddy LR7S is mostly made up of plastic material, giving it that lightweight build. While a few may find it lacking in terms of premium feel, GolfBuddy has actually done a commendable job at making this model appear top-tier. This matter is more about personal preference though if nothing else.
For support, a rubber grip is placed at the right side of the apparatus. Sadly, there is none on the opposite side, which might irk some left-handed users. You can, thankfully, insert the bundled strap in the strap eyelet that is beside the battery compartment, for added reinforcement.
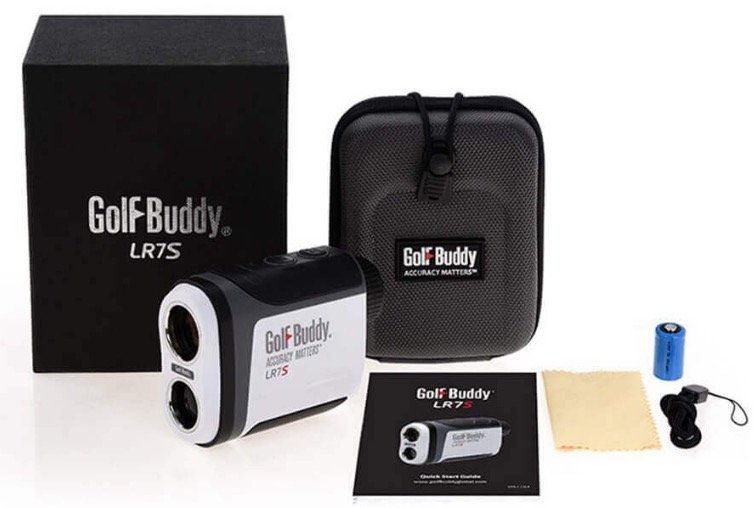
 Speaking of the bundle, this product is packaged with the following components: the main module, a CR2 battery, microfiber cloth, a carrying case, strap, and the quick start guide. These are the same contents that you would get if you were to purchase the standard LR7.
Once you are familiar with the GolfBuddy LR7S, and have accounted for its various accessories, it is finally time to get started. Like with most replaceable battery-powered machines, inserting one into this device is also the first step in operating it. To do so, remove the battery slot’s cover first.
Just lift the cap, rotate it counter-clockwise until it twists off. Afterwards, insert the CR2 3V battery that is provided by the manufacturer into the compartment, with the negative end facing up. At this moment, you can either turn on the device right away or make some adjustment to the eyepiece.
Either way, both works, albeit doing the latter first is slightly better because you get more field of view without the active display. Plus, not every model of the product comes with the optimal focus right out of the box, so some changes are bound to be made. To make the adjustments, simply rotate the diopter of the eyepiece left or right until your target becomes clearly visible.
After you have made all necessary modifications, you can then turn on the gadget by pressing the power button on the top. There are 4 different modes you can switch to in this particular device. Standard mode is the default, whereas the Scan Mode, Pin Mode, and Pin Finder Mode, all need to be accessed manually.
 To switch to another mode, simply press the MODE button until their corresponding icons appear, confirming that you are in that particular setup. Unfortunately, you can only advance through the options in one order, meaning you will have to loop back in case you skipped a mode. Almost all rangefinders operate this way, unlike GPS watches wherein you can directly select a specific option.
In each mode, you will see a crosshair-like icon in the center, which serves as your reticle or focus point. When ranging, the slope adjusted distance will be displayed just above the aforementioned symbol. It is the numbers with the largest font size, so it is hard to miss.
Beside the slope adjusted distance is where you will find the unit of measurement, represented by the letter M for meters and Y for yards. You can swap between M and Y by holding down the MODE button for at least 3 seconds. Only one metric unit can be displayed at a time.
The straight-line distance will be shown below the reticle. The measured height distance (H) is also displayed in the same spot, but both cannot appear together. Instead, the two values pop up in an alternating manner. The battery level icon is seen in the lowermost area.
When switching to scan mode, a letter S will show on the left side of the screen. As for the pin mode, the letter P will be added in the right. The pin finder mode on the other hand, will only show the P icon. Refer to the user manual for more information on every legend in the display.
Operating each mode is simple. In the standard setup, all you need to do is aim at the target, fire the laser, and the measurements will instantly appear in their respective place on the screen. In scan mode, just press the POWER button and the device will automatically update the values as you move through varying objects, lasting up to 10 seconds.
Pin mode is similar to scanning, but this time, it will prioritize targets that are closest to you. This is perfect for getting distances to flags that might have prominent backgrounds.
The pin finder mode does the same abovementioned target prioritization as well, but instead of a single press, you can simply hold down the power button and aim as is. You will even get a vibration feedback once you have lock-on to your intended marks.
Perhaps the biggest drawback of the LR7S, is the inability to turn off the slope measurement just like (more expensive) other golf rangefinders of Garmin or Leupold. And as you may or may not know, this slope compensation feature is strictly prohibited in official games, and maybe in some club competition too. Therefore, check your local establishment’s regulations prior, just to be safe.
Final Verdict 
<<== BUY the GolfBuddy LR7S Golf Rangefinder Now ==>>
Overall, the GolfBuddy LR7S is a product with great value. Although you cannot turn off its slope compensation feature, having it in a model that is far less expensive than most golf brands that offer it, is a one of a kind deal. Think of it as a cheaper alternative to check how slope measurement can influence your performance.
you have given very informative idea about golf instrument. thank a lot
Thanks Flora! I hope you’re happy with the GolfBuddy LR7S!